Web Editing Guides
The CSUMB website is managed by a collaborative effort between University Communications and Information Technology. Each department, division, and college has a section editor who is responsible for editing content in their respective sections.
This guide serves as a self-help tool for common editing tasks and content types.
Terminology
A web section is any part of the website with its own top navigation or left side navigation, a landing page, and at least three other pages.
A section editor is a faculty or staff member appointed by their appropriate administrator (MPP) as the individual who will coordinate and process the publishing of content in one or more assigned web sections.
Common Editing Tasks
In Terminalfour, a page is called a section. You can create a new section from the site structure interface.
- In the site structure, find the location in which you would like to add a page.
- Select the blue "Actions" button to the right of the site structure.
- Select "+ Create section"

- Name your section.
- The section name will be the default URL.
- For example, if the section is called "Adding a new page," then the end of the URL would be /adding-a-new-page.
- URLs can be overridden using the Output URI field.
- For example, if you wanted the end of the URL of the page called "Adding a new page" to be /page, you would type “page” into the Output URI field for that section.
- The section name will be the default URL.
- Save the section by selecting the blue "Save changes" button in the lower right corner.
You can also view Terminalfour’s Knowledge Base for more information about creating a section.
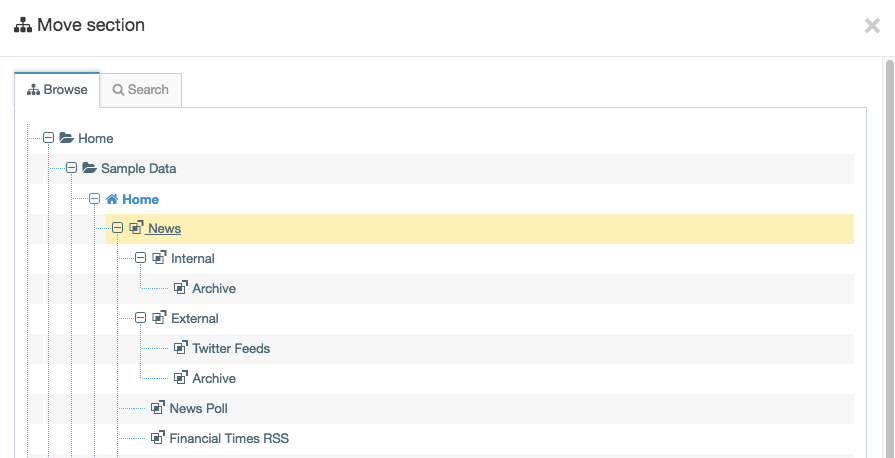
You can move sections within the site structure interface.
- From the site structure, find the section you would like to move.
- Select the blue "Actions" button to the right of that section.
- Select "Move section" from the menu that appears.
- Select the section's destination. The selected section will be highlighted with a yellow background.

- When the section has been moved successfully, a confirmation message will appear.

You can also view Terminalfour’s Knowledge Base for more information about moving a section.
To add an image or a document, simply select the image icon in the TinyMCE editor. Find an image or document that is in the Media Library and select it to add it to your page.
University Communications highly recommends looking through the Approved Image Selection folder in the Media Library before determining whether you should upload your own photos. This is to ensure brand consistency standards are met.
Adding Files and Images to the Media Library
You have access to your folder in the Media Library when you became a section editor, you can access it via the left menu in Terminalfour.
Steps to add an image
- Navigate to Content > Media Library in the left menu navigation.
- Select the green "Add media" button while in your folder.
- Fill out the fields correctly.
- Media File: Make sure to have a good file name as it will be seen.
- Name: Name we see in T4
- Description/alt text: Alt text for images
- Media Type: Image, PDF, etc.
- Syntax Highlighting Language: Ignore
- Keywords: Allows for others to easily find the file
- Select "Save changes."
To publish instant updates, use the "Publish section" button within a section or select "Publish section" via the blue "Actions" button in the site structure.
When publishing, it is important to know the different section statuses:
- Approved: shows as green. The content will be published at the top of the hour.
- Pending: shows as orange. The content won’t get published until approved. This status is mostly used for workflows.
- Inactive: shows as red. The content will no longer be available for the public to see on the site, but section editors can still see this content in the site structure. It can take up to a day before content made inactive disappears from the published site.
Triggering a publish
You can trigger a publish of your section or content by:
- Accessing the content and selecting the green "Publish" button on the top right
- Finding the page in the site structure, selecting the blue "Actions" button, and selecting "Publish section" or "Publish branch."
- Publishing a section will publish just that section.
- Publish a branch will publish the section as well as any child sections associated with it.
Checking the status of a publish
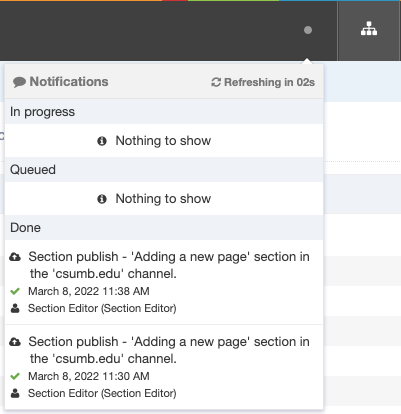
To check the status of a publish, select the small gray circle at the top right of the site structure. Selecting it will provide information about what content is in progress, queued, and done regarding publishes you have trigged.
Once a publish is "done," the changes should be live, and you should see them if you view your page in a different browser or if you do a hard refresh (Control+Shift+R or Command+Shift+R). A hard refresh clears the cache for that page, so you are able to see the most up-to-date version.

All events must be approved by the University Affairs, Ceremonies, and Events team before they can be published on the Events Calendar. This includes meetings and virtual events. Steps to request an event can be found on UACE's Events Workflow page.
If you would like a news feed on your college or department’s landing page, please contact University Communications. Your news stories will appear in your news feed. Please keep in mind that to have a news feed, it must be updated with at least three articles per month.
- Locate the section folder for the appropriate department and expand it
- Locate the “News Listing” folder
- Add a new section to the “News Listing” folder by selecting the blue action button to the right of “News Listing” and select “+ Create section” from the menu that pops up
- Name the section with the news title so that it’s easy to identify and select “Save Changes”
- Find the section you just created in the site structure and select it
- Select the “Content” tab
- Add new content by clicking on the green “+ Add content” button to the right of the page
- Select the “News - CSUMB” content type
- Fill in all required and relevant information in the “News - CSUMB” content type
- Name: does not display on the page and is for organizational purposes only.
- Title: displays on the page
- Abstract: what will show up in the news listing and should not exceed two lines
- Main Body: where you add all your news content including additional images
- Colleges and Department: these are the news listings that this story will appear in. Be sure to add the appropriate college or department here by clicking in the drop-down and selecting the appropriate menu item. If you do not add the appropriate college or department to this field, the story will not show up in the listing.
- Select “Save changes” in the bottom right when you’re done if you’d like to save your content as a draft. If you’re ready to publish, select the green “Publish” button in the upper right.
Note: News stories that live within a department section news listing cannot show up on the homepage or the dashboard, so those fields will not do anything if you complete them. If you would like your article to appear on the homepage or dashboard, please fill out the internal communications project request form.
Content Types
The General Content content type allows you to add paragraphs, images, and linked text to a page.
- From the site structure, select the section in which you would like to add a column.
- Select the "Content" tab.
- Select the green "+ Add content" button on the right side of the page.
- Select "General Content" from the list of content types.
- Fill in the "Name" field (which does not display on the page) and optional Heading (which appears on the page).
- Add text, images, or linked text to the "Main body" field.
Headings
- To make a line of text a heading, place your cursor in the text you would like to be a heading.
- Go to "Format," then "Formats," and then "Headings."
- Select the heading level you would like to apply from the menu.
Link text
- Highlight the text you would like to link.
- Select the link icon.
- Select how you would like to link the text from the menu that appears.
- Insert section link: links to another section within Terminalfour.
- Insert content link: links to a specific piece of content within Terminalfour.
- Link to external site: links to a website using a URL.
- Be sure to include the https://.
- Insert anchor: inserts an anchor that can be linked to within the page.
- The anchor name can be referenced with #whatyoucalledit at the end of the link.
- Example: csumb.edu/web/content-types/#whatyoucalledit
- To remove a link, highlight the linked text or place your cursor in the linked text and select the "remove link" button.
Insert an image
- Select the image icon in the formatting bar.
- Select the image you would like to insert from the Media Library.
- Refer to Terminalfour's Knowledge Base for more information on adding images to the Media Library.
Columns allow you to split your content area into two, three, or four columns.
- From the site structure, select the section in which you want to add a column.
- Select the "Content" tab.
- Select the green "+ Add Content" button on the right side of the page.
- Select "Column" from the list of content types.
- Fill in the "Name" field (which does not display on the page)
- Select the number of columns you’d like to display and the layout from the "Number of columns" dropdown.
- Use the TinyMCE editor to add content to the necessary column fields.
- "Save and approve" and publish the section.
Things to consider
-
- It is not possible to insert another content type (e.g., an accordion or a button) into a column.
- The "Name" should be something specific to this piece of content so that it makes sense when you revisit the page later.
- When viewed on a mobile device or narrow browser window, columns will display stacked one on top of one another. So it is in the best interest of the user to refrain from referring to columns as left or right because the position is dependent on the user’s screen size.
Accordions allow you to hide general content (e.g., text, bulleted lists, images, etc.) under a heading. The initially hidden content will display when the user selects the heading. Accordions are useful for an FAQ, further readings, or important but not critical information.
- From the site structure, select the section in which you want to add a column.
- Select the "Content" tab.
- Select the green "+ Add Content" button on the right side of the page.
- Select "Accordion" from the list of content types.
- Fill in the "Name" field (which does not display on the page), "Title" field (accordion title or heading), and use the TinyMCE editor to add content to the "Description" field.
- Select "Save and approve" and publish the section.
Things to consider
- You cannot add another content type (e.g., columns or another accordion) to an accordion.
- The "Name" should be something specific to this piece of content so that it makes sense when you revisit the page later.
- Navigate to the section in which you’d like to insert a button.
- Select the "Content" tab.
- Select the "+Add Content" button.
- Select the "Button" content type.
- Name the content type by filling in the "Name" field.
- Fill in the "Button Text" field with the text you would like to be displayed on the button.
- If the button destination link is external (not on the CSUMB site), copy the URL from your browser and paste it into the "Button link (external)" field.
- If the button destination link is internal (on the CSUMB site), select the "+Add section link" button and find the page in the site structure.
- Select "Save and approve" and publish the section.
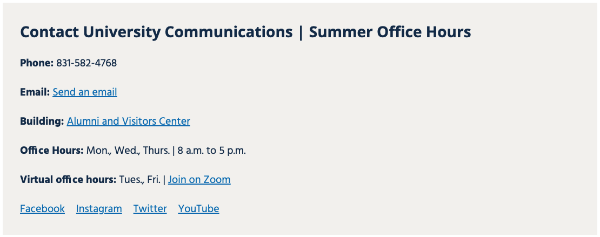
The Department Contact content type allows you to display contact information at the bottom of your section "Home" page.
Add Department Contact to a section
- From the site structure, select the landing page for your department.
- Navigate to the "Content" tab.
- Select the green "+ Add Content" button on the right side of the page.
- Select "Department Contact" from the list of content types.
- Fill in the required fields:
- Name: Is not displayed on the page
- Title: Title or heading for the department contact information
- Building: Building Name
- Phone number: Department phone number
- Office hours: Available days and times. For example, Mon., Wed., Thurs., | 8 a.m. to 5 p.m.
- Fill in any optional fields:
- Virtual office hours: Available days. For example, Tues., Fri. |
- Virtual office hours link: URL for Zoom meeting or online appointment request
- Virtual office hours link text: The words that will be linked to the 'virtual office hours link' listed in the previous field. For example, 'Join on Zoom' (shown below).
- Email: Department email address
- Facebook link: URL for your department's Facebook page
- Instagram link: URL for your department's Instagram account
- Twitter link: URL for your department's Twitter account
- YouTube link: URL for your department's YouTube channel
- Select "Save and approve."
- Publish the section.
Example
