Student Instructions
Registration
Learn how to do various registration-related tasks in Oasis
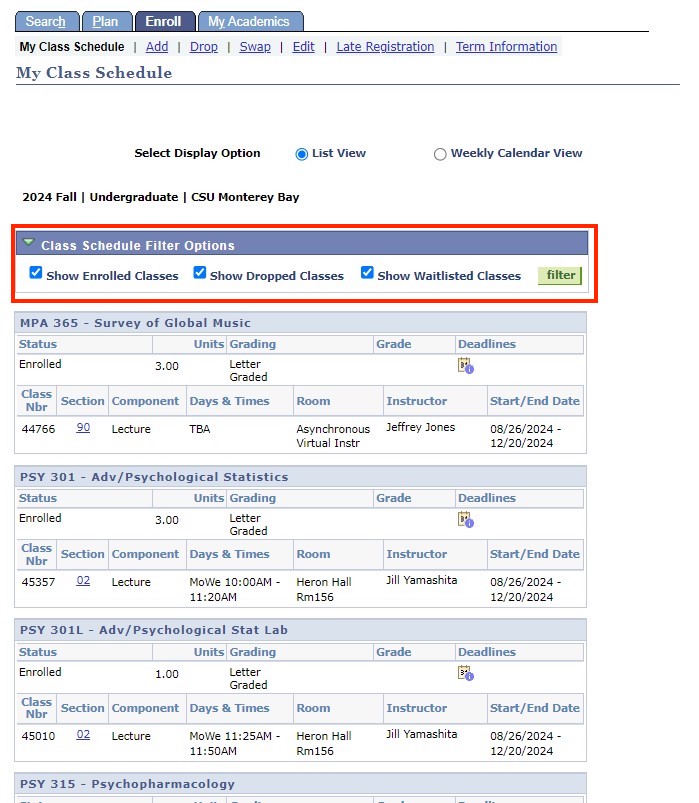
Check for Registration Holds
Use OASIS to check for holds that may prevent registration.
Step 1: Open OASIS Student Center
- Go to the CSUMB Dashboard.
- Log in using your username and password.
- Select Academic Services.
- Select OASIS Student Center.
Step 2: Locate holds
- Find the Holds section.
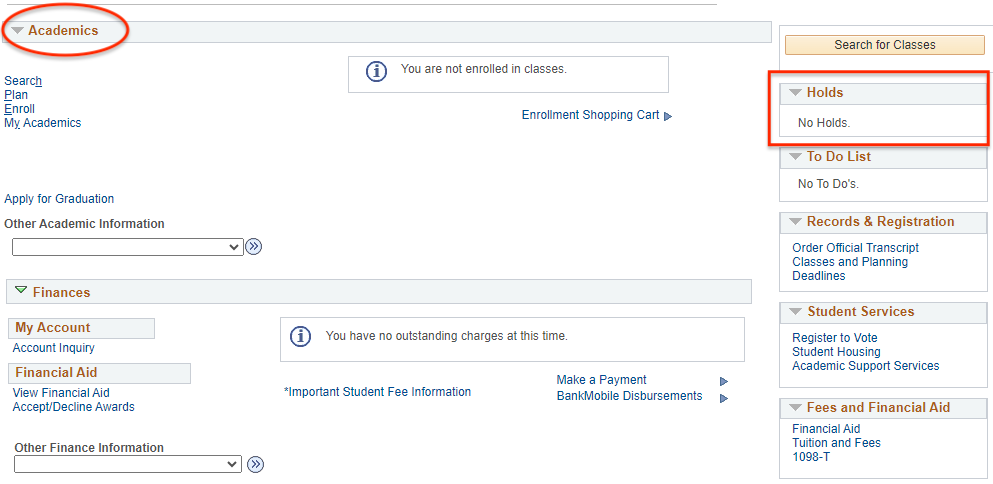
Step 3: Review holds
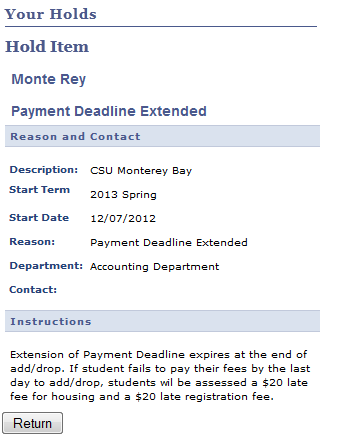
- Select each hold to view details.

Step 4: Resolve holds
Follow the instructions to resolve the hold.
Use OASIS to find your registration date and time.
Step 1: Open OASIS Student Center
- Go to the CSUMB Dashboard.
- Log in using your username and password.
- Select Academic Services.
- Select OASIS Student Center.
Step 2: Find appointment
- Locate Enrollment Dates.
- View your assigned date and time.
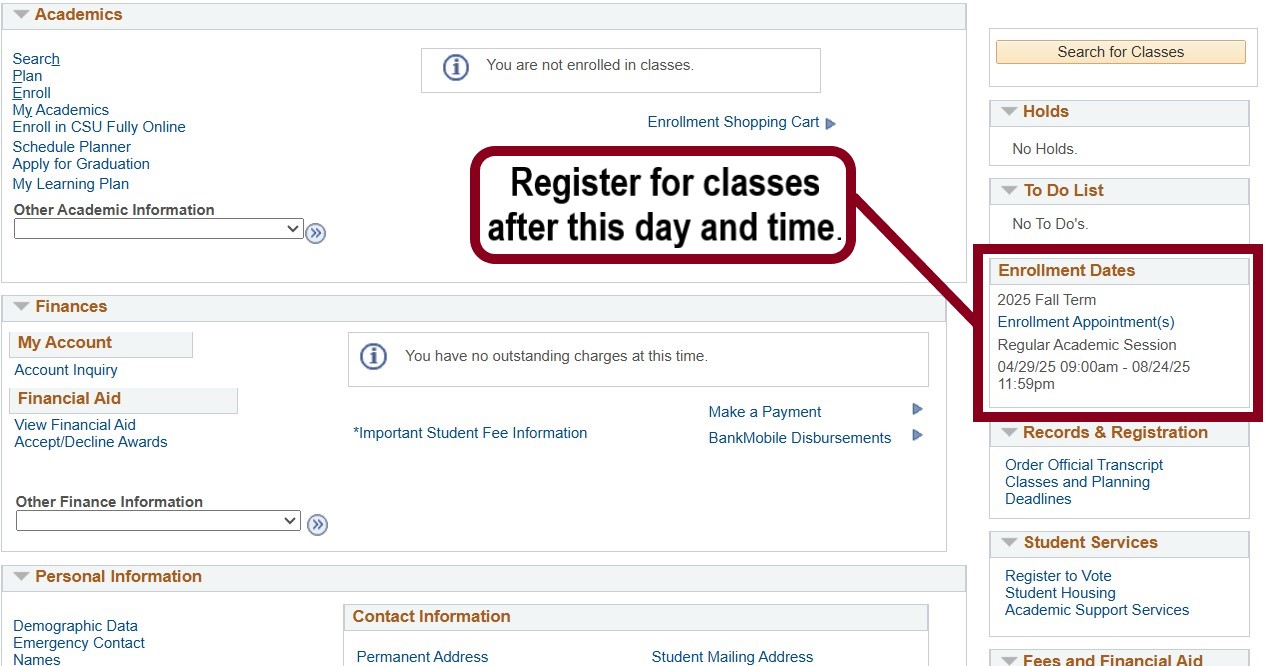
Step 3: Prepare for registration
Log in at your assigned time to enroll.
Use OASIS to enroll in a class.
Before you begin
- Know which class you want to add.
- Check that you do not have any registration holds.
- Have a backup class in case your first choice is full.
Step 1: Open OASIS Student Center
- Go to the CSUMB Dashboard.
- Log in using your username and password.
- Select Academic Services.
- Select OASIS Student Center.
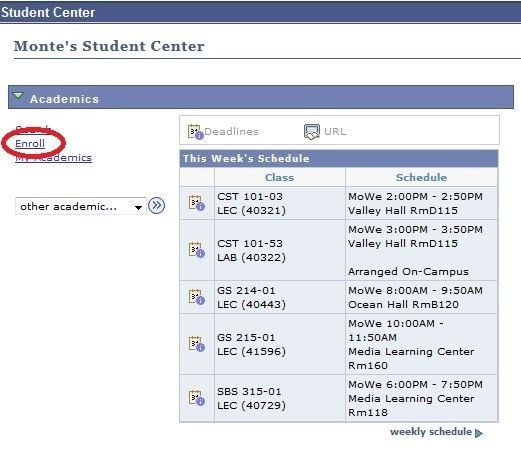
Step 2: Open enrollment
- Locate the Academics section.
- Select Enroll.
Step 3: Select a term
- Choose the correct term (for example, Fall or Spring).
- Select Continue.
Step 4: Find a class
- Enter a class number, or search using:
- Subject (for example, ENGL)
- Course number (for example, 101)
- Select Search.
- Review the results.
Step 5: Select the class
- Choose the correct class section.
- Review:
- Course name and number
- Units
- Meeting days and times
Step 6: Add to cart
- Select Next.
- Confirm the class is added to your shopping cart.
Step 7: Enroll
- Select Proceed to Step 2 of 3.
- Review your selection.
- Select Finish Enrolling.
Step 8: Confirm enrollment
Review the enrollment results displayed on the screen.
Confirm your enrollment status:
- A success message means the class was added successfully.
- An error message means the class was not added.
If you see an error:
- Select Fix Errors to return to your shopping cart.
- Follow the instructions to resolve the issue.
If your enrollment is affected by a hold:
- Review your account holds.
- Follow the instructions provided to resolve each hold.
Review all messages carefully:
- You may be enrolled in some classes but have issues with others.
Some classes require a permission number (also called an add code) to enroll. These are used when a course has restricted enrollment or requires instructor or department approval.
You may need a permission number if:
- The class is full but the instructor approves your enrollment
- The course requires instructor or department consent
- Your prerequisites are not yet showing in OASIS (for example, transfer credit)
Before you begin
- Obtain a permission number from your instructor or department.
Follow Steps 1–4 in “Add a Class,” then continue below:
Step 5: Enter permission number
- Select the class.
- Enter the permission number in the permission field.
Step 6: Complete enrollment
- Select Next.
- Add the class to your cart.
- Select Finish Enrolling.
Step 7: Confirm enrollment
Verify the class was added successfully.
Swap a Class
Use OASIS to replace one class with another.
Step 1: Open OASIS Student Center
- Go to the CSUMB Dashboard.
- Log in using your username and password.
- Select Academic Services.
- Select OASIS Student Center.
Step 2: Open swap page
- Locate the Academics section.
- In the Other Academic Information menu, select Enrollment:Swap.
- Select Go to open the swap page.
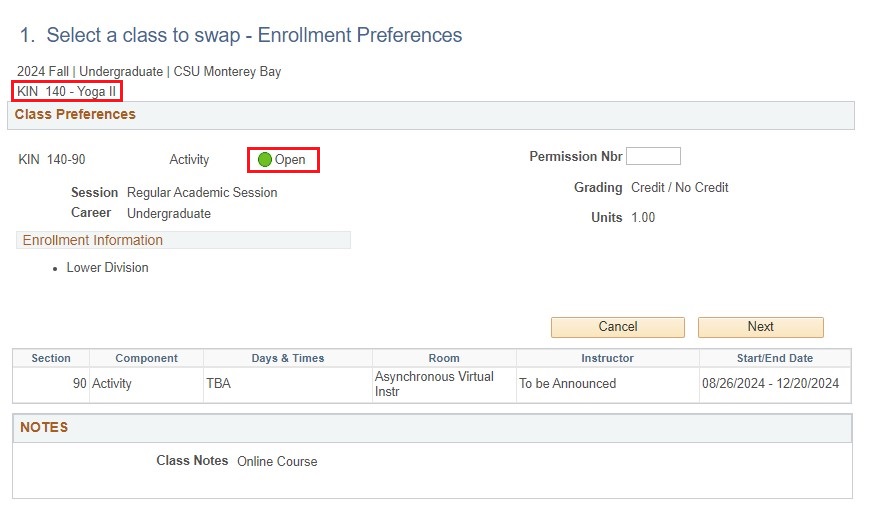
Step 3: Select class to swap out
- Choose the class you want to remove.
Step 4: Select replacement class
- Search for the new class.
- Select the correct section.
Step 5: Complete swap
- Select Next.
- Review both classes.
Step 6: Save and Confirm results
- Select Finish Swapping.
- Ensure the new class was added and the original class was removed.
Use OASIS to join a waitlist for a class that is full. Not all classes have a waitlist. If a waitlist is not available, you may need to choose another class or contact the department for options.
Before you begin
- Waitlisting does not guarantee enrollment.
- You may waitlist up to 8 units during a single term.
- You must not have time conflicts or registration holds.
- You cannot enroll in one section of a course and waitlist for another section of the same course.
Step 1: Open OASIS Student Center
- Go to the CSUMB Dashboard.
- Log in using your username and password.
- Select Academic Services.
- Select OASIS Student Center.
Step 2: Open enrollment
- Locate the Academics section.
- Select Enroll.
Step 3: Select a term
- Choose the correct term.
- Select Continue.
Step 4: Find a class
- Enter the class number, or search using:
- Subject
- Course number
- Select Search.
Step 5: Select the class
- Choose the correct class section.
- Review class details, including meeting times and units.
Step 6: Add to waitlist
- Select the option to Waitlist the class.
- Select Next.
- Add the class to your shopping cart.
Step 7: Submit your request
- Select Proceed to Step 2 of 3.
- Review your selection.
- Select Finish Enrolling.
Step 8: Confirm waitlist status
- Review the results on the screen.
- Confirm that you were added to the waitlist.
After you join the waitlist
- If a seat becomes available, you may be automatically enrolled.
- Check your schedule regularly in the OASIS Student Center.
- Make sure you do not have time conflicts or holds, or you may not be enrolled from the waitlist.
- You are responsible for removing yourself from the waitlist if you no longer want the class.
After classes begin
- Waitlists are no longer used for automatic enrollment.
- To add a class after the term begins, you must obtain permission from the instructor. This often requires attending the first day of class to ask if space is available.
- Your waitlist position is used for instructor reference only.
Use OASIS to remove a class from your schedule.
Step 1: Open OASIS Student Center
- Go to the CSUMB Dashboard.
- Log in using your username and password.
- Select Academic Services.
- Select OASIS Student Center.
Step 2: Open drop page
- In the Academics section, select Enroll.
- Select the Drop tab.
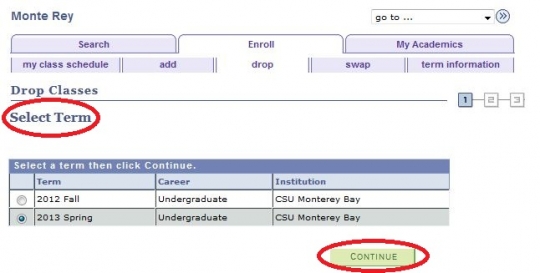
Step 3: Select a class to drop
- Choose the correct term.
- Select the class you want to drop.
Step 4: Drop the class
- Select Drop Selected Classes.
- Confirm your selection.
- Select Finish Dropping.
Step 5: Confirm results
Check for a confirmation message that the class was dropped.
Use OASIS to update details for a class you are enrolled in.
Step 1: Open OASIS Student Center
- Go to the CSUMB Dashboard.
- Log in using your username and password.
- Select Academic Services.
- Select OASIS Student Center.
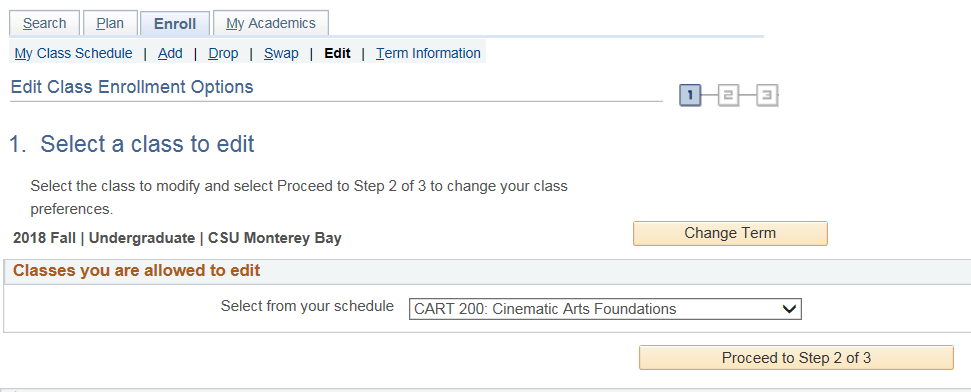
Step 2: Open edit page
- Select Enroll.
- Select the Edit tab.

Step 3: Select class
- Choose the term.
- Select the class you want to update.
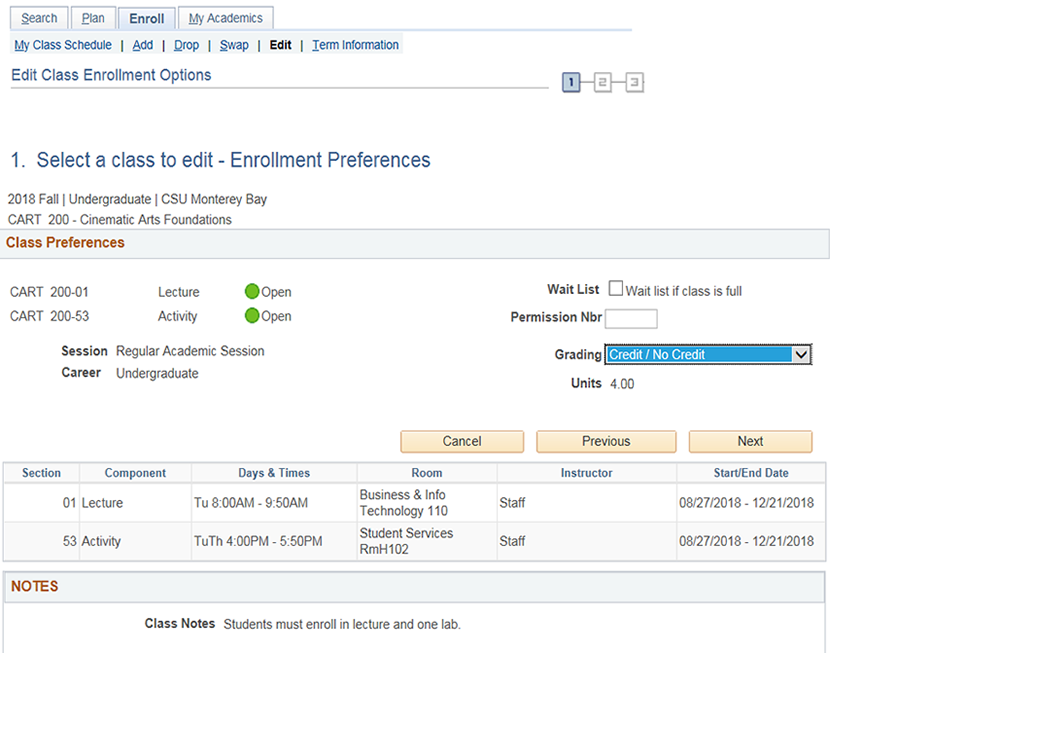
Step 4: Make changes
- Update available options such as grading basis or related section:
Some classes allow you to choose how your grade is recorded (for example, a letter grade or pass/no pass).
If this option is available:
- Locate the grading option during enrollment.
- Select your preferred grading option.
You can change your grading option until the add/drop deadline (the last day to add or change classes).
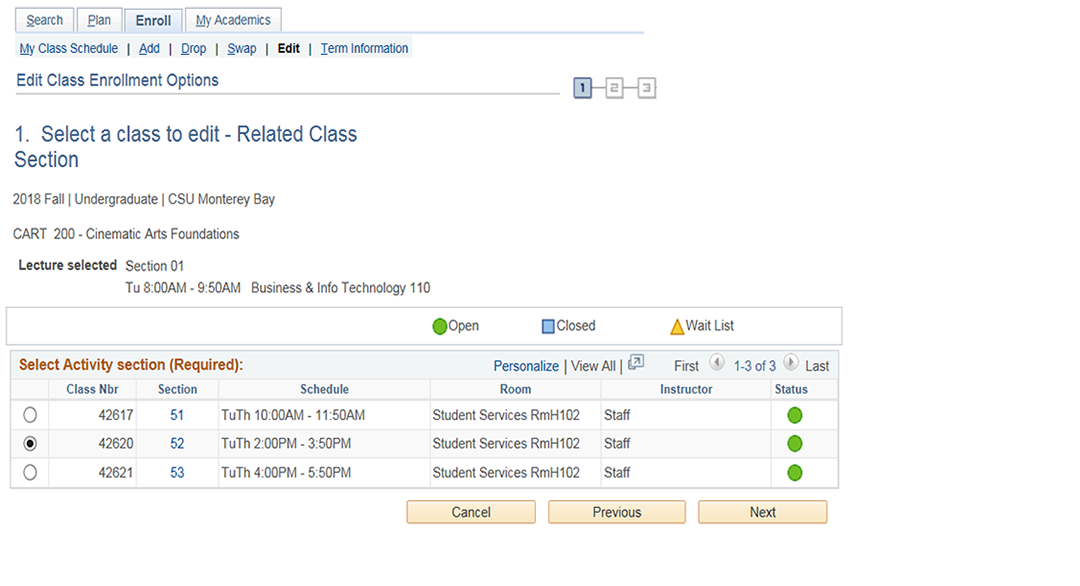
Some classes require you to enroll in more than one section, such as a lecture and a discussion.
During enrollment:
- Review the available section options.
- Select one section for each required component.
You can change your selected sections until the end of the add period (the deadline to add or change classes).
Step 5: Save changes and confirm results
- Select Next.
- Confirm you changes
Select Finish Editing
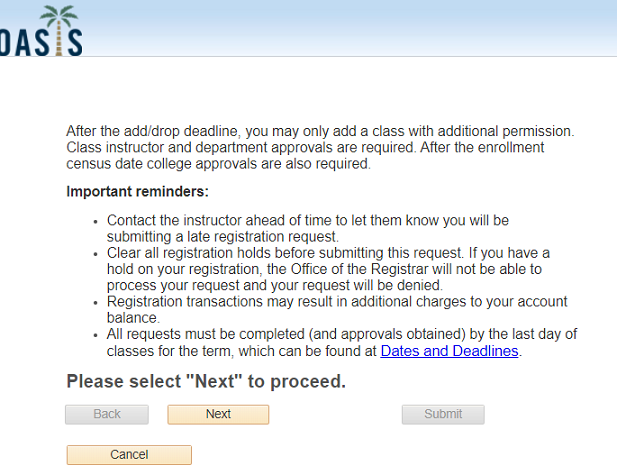
After the add/drop deadline, you can no longer add or swap classes through regular enrollment. To request a change, you must submit a petition through OASIS.
Late add petitions are reviewed as special exceptions and require approval from the instructor and department. You must provide a detailed explanation of why you were unable to add the class before the deadline. Approval is not guaranteed.
Before you begin
- Late add petitions are not guaranteed to be approved.
- Contact the instructor before submitting your request.
- Clear any registration holds on your account.
- Check that the class does not conflict with your current schedule.
Step 1: Open OASIS Student Center
- Go to the CSUMB Dashboard.
- Log in using your username and password.
- Select Academic Services.
- Select OASIS Student Center.
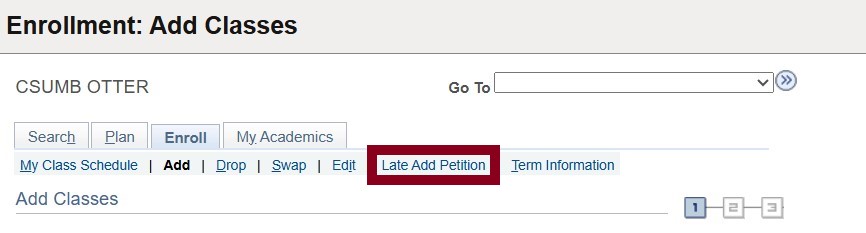
Step 2: Open Late Add Petition
- Select Enroll.
- Select Late Add Petition.
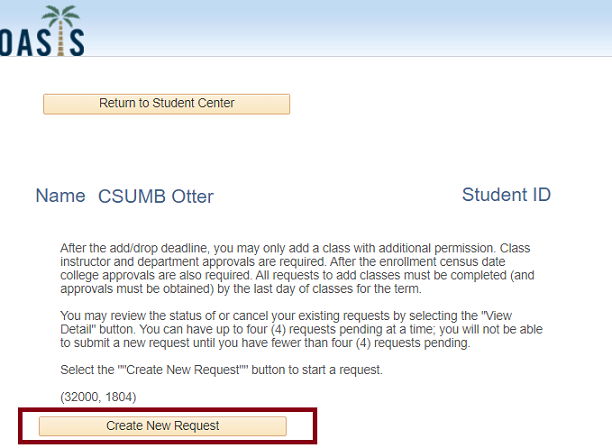
Step 3: Create a new request
- Select Create New Request.
- Review the information provided.
- Select Next to continue.
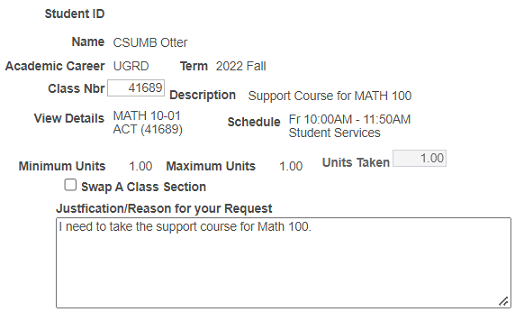
Step 3: Enter class information
- Enter the class number in the Class Number field.
- If needed, use the class schedule to find the correct class number.
- Continue to the next step after entering the class number.
- If the class requires an additional section (such as a lab or activity), you must select that section before continuing.
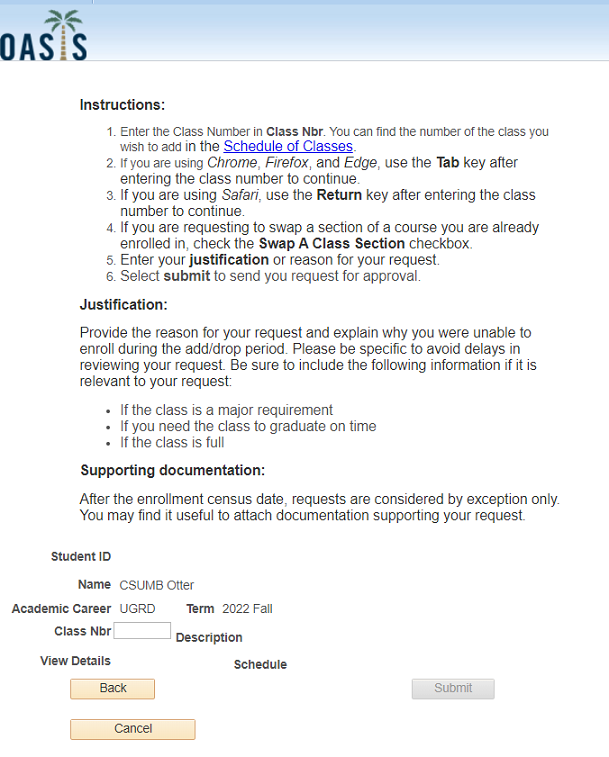
Step 4: Enter your reason for the petition
- Review the class information displayed.
- Enter a detailed explanation of why you were unable to add the class before the deadline.
- Provide specific information to support your request.
Step 5: Attach documentation (if applicable)
- You may upload supporting documents to explain your situation.
- After the enrollment census date, documentation is required and requests are rarely approved.

Step 6: Submit your request
- Select Submit.
- Your request will be sent for review.
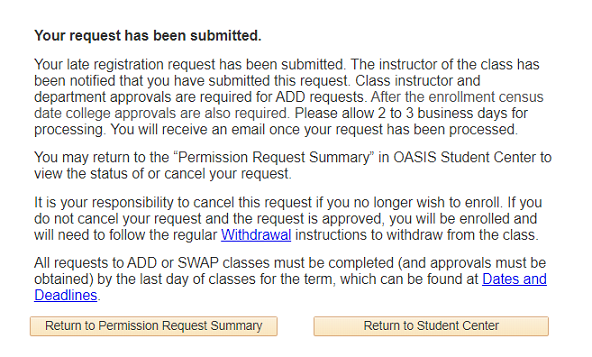
Step 7: Review and approval process
- Your request will be reviewed by:
- The instructor
- The department chair
- The college dean (if submitted after the census date)
- You will receive an email when a decision is made.
- Processing may take 2 to 3 business days.
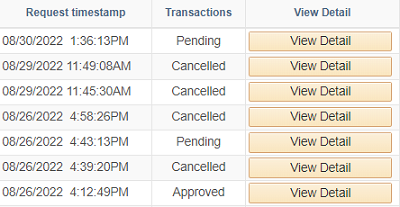
Step 8: Check request status
- Log in to OASIS Student Center.
- Select Enroll.
- Select Late Add Petition.
- Select View Details to see the status of your request.
Step 9: Cancel a request (optional)
- Go to the CSUMB Dashboard.
- Select OASIS.
- Select Student Center.
- Select Enroll.
- Select Late Add Petition.
- Locate your request and select View Details to review its status.
- If the request has not been approved:
- Select Cancel Request.
- Enter a reason for canceling your request.
- Select OK to confirm.
Important notes
- Late add petitions are required after the add/drop deadline.
- Approval is not guaranteed.
- Requests must be completed no later than the last day of classes.
- You will be notified by email if your request is approved or denied.
Records
Learn how to do various records-related tasks in Oasis
Use OASIS to view or download your unofficial transcript.
Step 1: Open OASIS Student Center
- Go to the CSUMB Dashboard.
- Log in using your username and password.
- Select Academic Services.
- Select OASIS Student Center.
Step 2: Open transcript request page
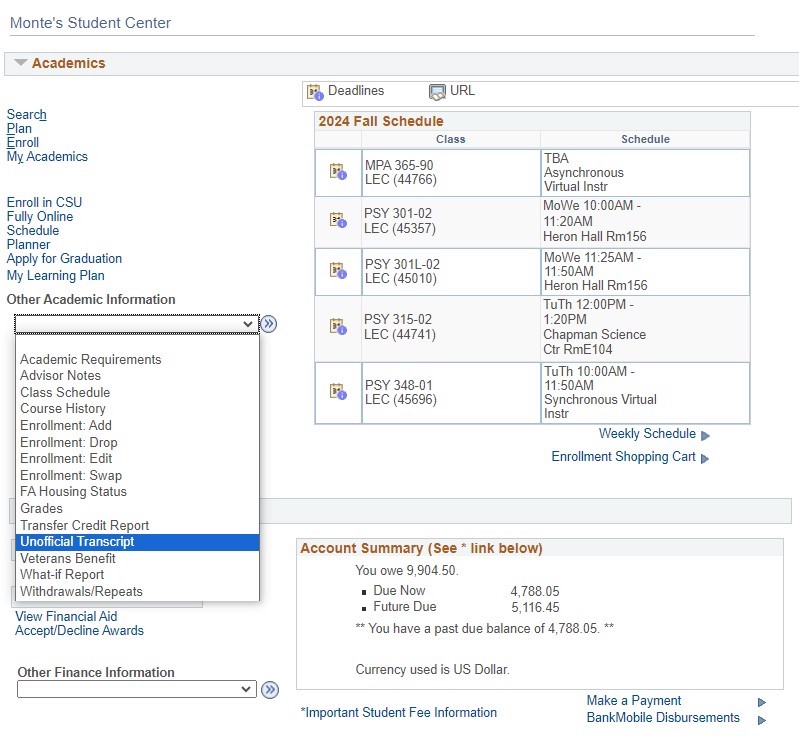
- Locate the Academics section.
- Select Other Academic Information.
- Choose Transcript: View Unofficial from the list.
- Select Go.
Step 3: Request your transcript
- Select Report type
- Choose Unofficial Transcript from the list
- Select View Report.
Your transcript will open as a PDF file.
If the PDF does not appear:
- Check your browser for a pop-up notification.
- Allow pop-ups for this site.
- Try opening the transcript again.
Use OASIS to view your grades for a selected term.
Step 1: Open OASIS Student Center
- Go to the CSUMB Dashboard.
- Log in using your username and password.
- Select Academic Services.
- Select OASIS Student Center.
Step 2: Open grades page
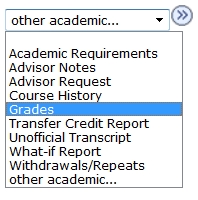
- Locate the Academics section.
- Select Other Academic.
- Choose Grades from the list.
- Select Go.
Step 3: Select a term
- Choose the term you want to view.
- Select Continue.
Step 4: View your grades
- Review the grades displayed for each class in the selected term.
Important notes
- Grades are available after they have been submitted and processed.
- If a grade is not displayed, it may not yet be posted.
Use OASIS to view or print your enrollment verification.
Step 1: Open OASIS Student Center
- Go to the CSUMB Dashboard.
- Log in using your username and password.
- Select Academic Services.
- Select OASIS Student Center.
Step 2: Open enrollment verification
- Locate the Academics section.
- Select Other Academic Information.
- Choose Enrollment Verification from the list.
- Select Go.
Step 3: Select information to include
Select the information you want to include in your enrollment verification.
Two options are selected by default.
To include your GPA:
- Locate the option labeled My Term and Cumulative GPA.
- Select this option.
Step 4: View your enrollment verification
- Your enrollment verification will display on the screen.
Step 5: Print or save your verification (optional)
- Use your browser or device options to print the page
Your enrollment verification will open as a PDF file.
If the PDF does not appear:
- Check your browser for a pop-up notification.
- Allow pop-ups for this site.
- Try opening the document again.
Important notes
- Enrollment verification shows your current enrollment status.
- This document may be used to confirm enrollment for services such as insurance, employment, or housing.
Use OASIS to review or update your emergency contact information.
Step 1: Open OASIS Student Center
- Go to the CSUMB Dashboard.
- Log in using your username and password.
- Select Academic Services.
- Select OASIS Student Center.
Important notes
- Keep your emergency contact information up to date.
- Emergency contacts may be used by the university in urgent situations.
Step 2: Open emergency contacts
- Locate the Personal Information section.
- Select Emergency Contacts.
Step 3: View your contacts
- Review the emergency contacts listed on the screen.
Step 4: Add a new contact
- Select Add an Emergency Contact.
- Enter the required information, such as:
- Name
- Relationship
- Phone number
- Select Save.
Step 5: Update an existing contact
- Select the contact you want to update.
- Edit the necessary information.
- Select Save.
Step 6: Delete a contact (optional)
- Select the contact you want to remove.
- Select Delete.
Confirm the deletion if prompted.
Use OASIS to review or update your mailing and home address.
Step 1: Open OASIS Student Center
- Go to the CSUMB Dashboard.
- Log in using your username and password.
- Select Academic Services.
- Select OASIS Student Center.
Step 2: Open addresses
- Locate the Personal Information section.
- Select Addresses.
Step 3: View your addresses
- Review the addresses listed on the screen.
Step 4: Add a new address
- Select Add a New Address.
- Select the address type (for example, Home or Mailing).
- Enter the required address information.
- Select Save.
Step 5: Update an existing address
- Select the address you want to update.
- Edit the necessary information.
- Select Save.
Step 6: Delete an address (if available)
- Select the address you want to remove.
- Select Delete (if the option is available).
- Confirm the deletion if prompted.
Important notes
- Make sure your address information is accurate and up to date.
- Your mailing address may be used for official university communications.
Use OASIS to review or update your phone numbers.
Step 1: Open OASIS Student Center
- Go to the CSUMB Dashboard.
- Log in using your username and password.
- Select Academic Services.
- Select OASIS Student Center.
Step 2: Open phone numbers
- Locate the Personal Information section.
- Select Phone Numbers.
Step 3: View your phone numbers
- Review the phone numbers listed on the screen.
Step 4: Add a phone number
- Select Add a Phone Number.
- Select the phone type (for example, Mobile or Home).
- Enter the phone number.
- Select Save.
Step 5: Update an existing phone number
- Select the phone number you want to update.
- Edit the necessary information.
- Select Save.
Step 6: Delete a phone number (if available)
- Select the phone number you want to remove.
- Select Delete (if the option is available).
- Confirm the deletion if prompted.
Important notes
- Make sure your phone numbers are accurate and up to date.
- The university may use your phone number to contact you about important information.
Your academic records are protected by federal privacy law (FERPA). To allow someone else (such as a parent or guardian) to access your records, you must complete an authorization form in OASIS.
Step 1: Open OASIS Student Center
- Go to the CSUMB Dashboard.
- Log in using your username and password.
- Select Academic Services.
- Select OASIS Student Center.
Step 2: Open authorization settings
- Locate the Personal Information section.
- Select Authorize to Release.
Step 3: Review the authorization form
- Read the information provided on the page.
- This explains:
- How your records are protected
- Which offices can share your information
- How to complete the form
Step 4: Add a person to receive your information
- Enter the person’s first and last name.
- Create a 4-digit access code.
- Share this code only with the person you are authorizing.
- Enter an expiration date for access (between 1 and 365 days).
Step 5: Select what information can be shared
- Choose the office or department that can release your information.
- Select the type of records that can be shared.
- Enter the reason for sharing this information.
- You can:
- Add more records for the same person
- Add additional people
- Update or change access at any time
Step 6: Provide access information to your designee
The person you authorize must:
- Identify themselves
- Provide your name and student ID
- Provide the access code you created
Do not share this information with anyone else.
Important notes
- Only you (the student) can submit this authorization.
- You can remove access at any time.
- Authorization applies only to the offices you select.
Graduation and Degree Progress
Learn how to do various graduation and degree progress-related tasks
Use OASIS to review your degree progress and remaining requirements.
Step 1: Open OASIS Student Center
- Go to the CSUMB Dashboard.
- Log in using your username and password.
- Select Academic Services.
- Select OASIS Student Center.
Step 2: Open Academic Requirements
- Locate the Academics section.
- Select Academic Requirements.
Step 3: View your report
- Your Academic Requirements Report will display on the screen.
- Review the information to understand your progress toward your degree.
Step 4: Review requirement details
- The report includes information such as:
- Completed courses
- Courses in progress
- Remaining requirements
- Transfer credits (if applicable)
Step 5: View course details (optional)
- Select a requirement to view more details about the courses that apply.
Important notes
- The Academic Requirements Report is for planning purposes.
- Always confirm your requirements with your academic advisor.
- If information appears incorrect, contact your advisor or the Registrar’s Office.
Use OASIS to submit your graduation application.
Before you begin
- Meet with your academic advisor to confirm the term you will complete your degree requirements.
- Review your Academic Requirements Report to ensure your information is correct.
- Be prepared to pay the graduation application fee before submitting your application.
Step 1: Open OASIS Student Center
- Go to the CSUMB Dashboard.
- Log in using your username and password.
- Select Academic Services.
- Select OASIS Student Center.
Step 2: Open the graduation application
- Locate the Academics section.
- Select Apply for Graduation.
Step 3: Confirm your academic program
- Review your major, concentration, and minor information.
- Confirm that all information is correct before continuing.
- If any information is incorrect, stop and contact your academic advisor before proceeding.
Step 4: Review your diploma name
- Review the name that will appear on your diploma.
- If needed, update your diploma name before the deadline.
Step 5: Review your address
- Confirm your permanent address.
- Update your address if needed.
Step 6: Select your graduation term
- Choose the term in which you will complete all degree requirements.
- If your term is not listed, wait until the application period opens or contact the Registrar’s Office.
Step 7: Enter additional information (if required)
- If you are completing coursework at another institution, provide details about where and when the coursework will be completed.
Step 8: Pay the graduation fee
- Select Pay Graduation Fee.
- Complete your payment.
- Return to OASIS after your payment is confirmed.
Step 9: Submit your application
- Select Submit Application.
- Confirm that your application was successfully submitted.
Step 10: Review your application status
- A graduation counselor will review your academic record.
- Your Academic Requirements Report will be updated after review.
- You will receive a notification by email when the review is complete.
Important notes
- You must complete all degree requirements by the end of the term in which you apply to graduate.
- Applying for graduation does not guarantee your degree will be awarded.
- You are responsible for reviewing your Academic Requirements Report and resolving any missing requirements.
If you need to access CashNet manually to submit a payment for Graduation Fees, please follow the steps below.
Step 1
Access CashNet. You will need to login with your Otter ID if you are not already logged in.
Step 2
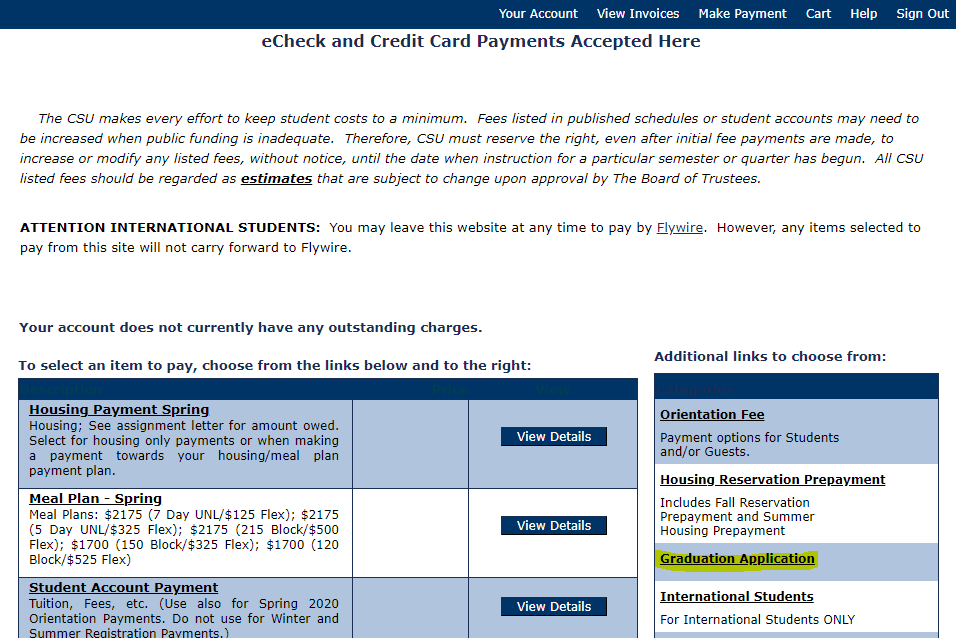
Under the Additional Links on the right, click on Graduation Application.
Step 3
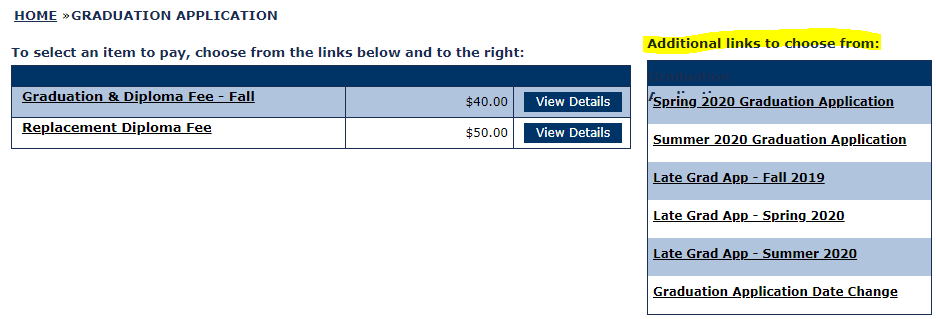
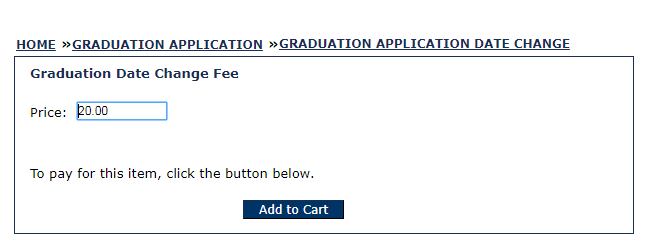
Select the appropriate fee based on the term you are applying for graduation. If you have already applied and are changing your graduation date, select Graduation Application Date Change. Refer to the Deadlines and Fees page for additional information on fees due.
Step 4
Click Add to Cart.
Step 5

Click Checkout when you are ready to complete the transaction. Be sure you receive a payment receipt email and forward it to graduation@csumb.edu so our office can update your graduation status.